Pages

Friday 29 June 2018

The Chevalier Gaillardhomme, Sieur de Grand-Werly

Hello again.

Another week at work over and time for another post!

Last time out, I introduced you to my fictional British hero, Major-General Sir Cheslyn Hay, who will, on Sunday 8th July, be leading his forces into battle against those dastardly Frenchies in the Relief of Fort Nummanmason at the Barrage Show in Stafford. The venue is Blessed William Howard High School, which will be masquerading as somewhere in New France for the purposes of our game!

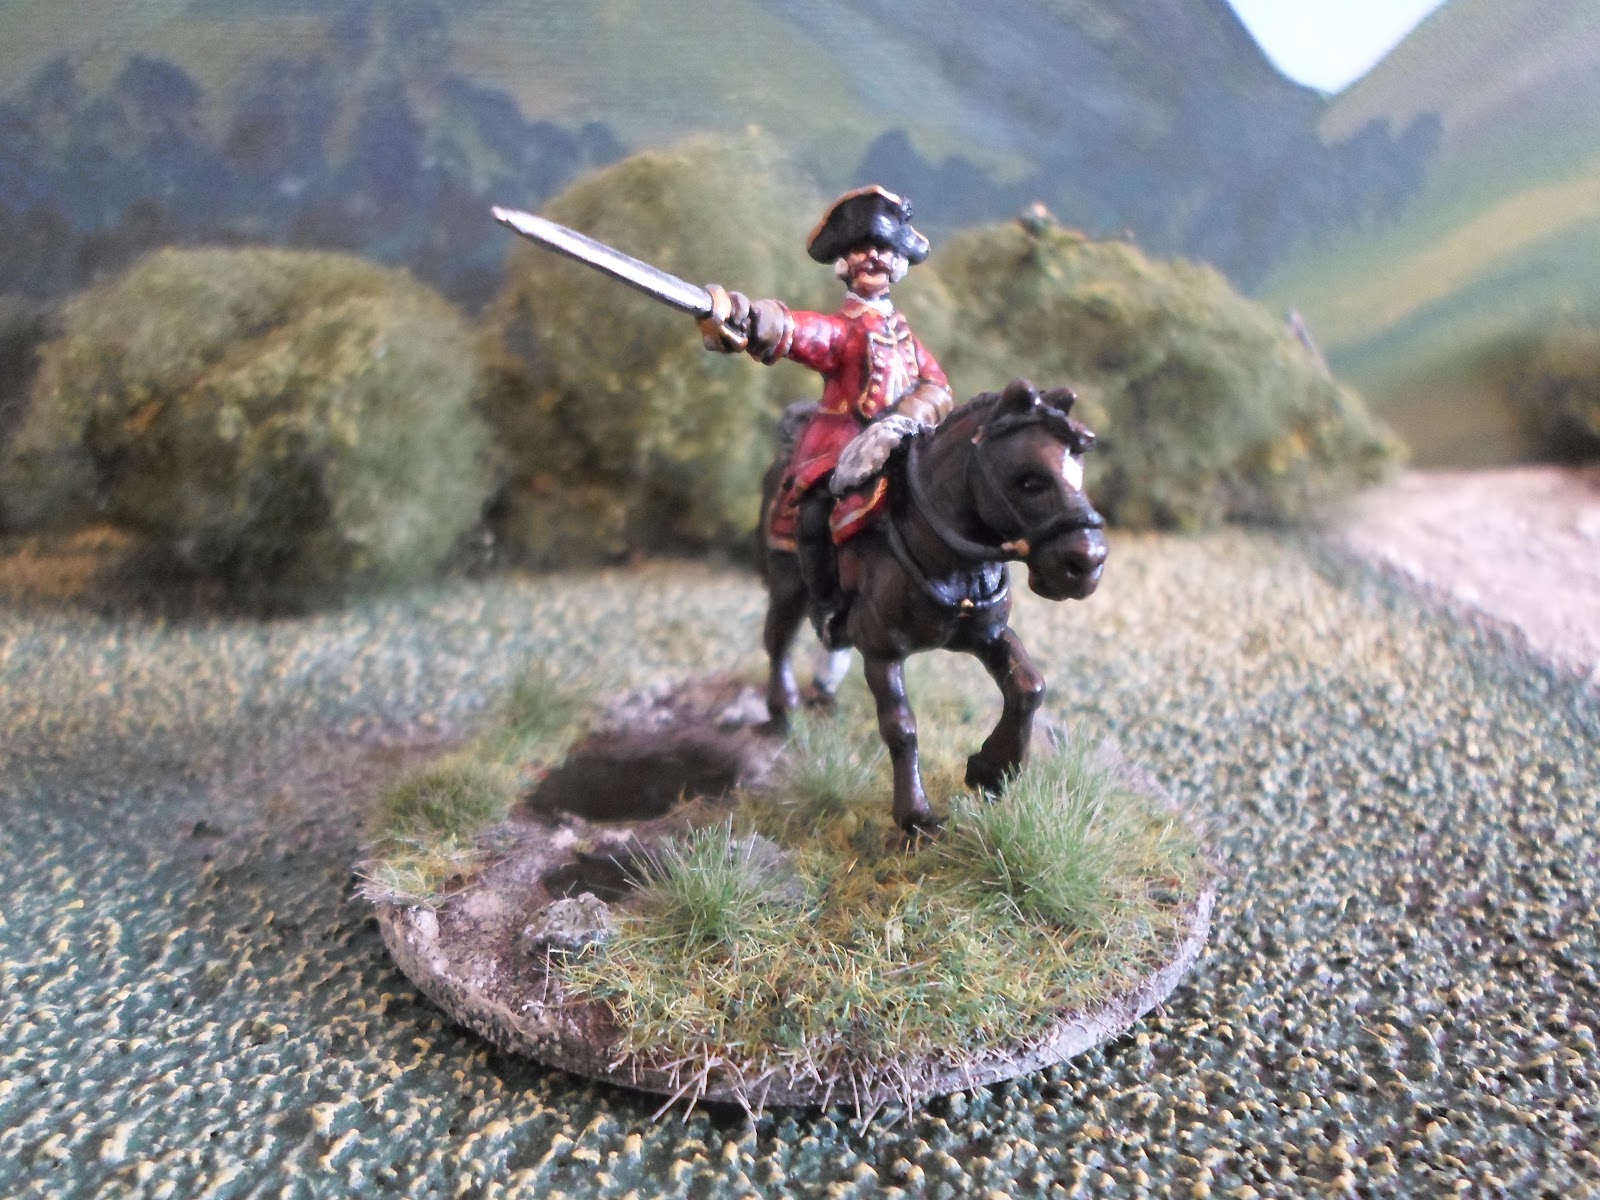
Well, every hero needs an (anti-) hero, so I present for you the Chevalier Gaillardhomme, Sieur de Grand-Werly. This worthy will be leading the aforementioned dastardly Frenchies in the encounter outside the walls of Fort Nummanmason, and keen to give the upstart Roastbeefs a good lesson in humiliation.

Now, no history or other book will enlighten you on the careers or activities of either of these men, as they are both created by yours truly, but a brief scan f a map of South Staffordshire will yield the adjacent villages of Cheslyn Hay (boo!) and Great Wyrley (hurrah!). Curiously, Occasional Wargamer Brother Kev lives in Cheslyn Hay (boo!), along with his family, which includes Occasional Wargamer Nephew Ben. Guess which role one of these two will be getting!

Your worthy scribe lives in Great Wyrley (hurrah!) and "Gaillardhomme" just happens to be a direct translation into French of his surname. Hm. Guess which role I have bagsed!

Anyway, the Chevalier is an Eagle Figures product painted, as always, by yours truly, and the forthcoming affair at Fort Nummanmason will also be his first outing as he aims to uphold local village honour (not to mention staving off eventual French defeat in and loss of Canada).

Every great man needs an aide, however, so a Dixon Miniatures French officer will masquerade as that aide, his name as yet to be confirmed, but it will be something vaguely humorous along the lines of General de Brigade du Bious, Colonel Sacre-Bleu, Major Zut-Alors, Colonel de la Catessen, General de Meanor or similar.

Hope to see at least some of you at Barrage. Come over and say "Hello!"

G


Three shots of "le Grand Fromage" himself, directing his forces as befits a French nobleman, however minor. The texturing on the base began by gluing on a small strip of doormat as coarse, long grass and adding the twig, then coating with a coat of Basetex Dark Earth textured paint, topped with static grass of mixed hue. The areas I left as earth were then drybrushed up through earth to sand to light sand using matchpots and grass tufts were added of varying lengths to complete the look. I did paint the doormat sliver before gluing it down.
 
 
The aide. As Dixon Miniatures are smaller than most of my FIW stock, this diminutive fellow got to stand on a rock, similar to some of his British counterparts from the same stable.

Monday 18 June 2018

Major-General Sir Cheslyn Hay and colleagues

Hello again.

Hot on the heels of Fort Nummanmason comes the command for the relief force.

Now, you may well try and research the aforementioned Major-General in your various books and articles on the Seven Years' War, the French & Indian Wars or the British Army of the Eighteenth Century, but let me hereby warn you against such folly. You see, the fellow never existed...

...except in my head, at any rate.

I live in a village called Great Wyrley. It adjoins another village which goes by the name of Cheslyn Hay. The villages have a tiny rivalry, with their respective High Schools trying to outdo each other in terms of level of mediocracy at any number of events both academic and otherwise and, being a fan of the Charles Grant school of thought, of the imaginations idea in general and similar schemes, I thought I would use that "local" knowledge and rivalry for the forthcoming show game set in the FIW. IN due course, I will present for you the Chevalier Gaillardhomme, Sieur de Grand-Werly. This particular outing, however, is to enable me to present the commander of my British and allied forces, Major-General Sir Cheslyn Hay.


The Major-General is a former liaison with the Prussians, hence his propensity for sporting a moustache, but is latterly commanding the forces sent to relieve Fort Nummanmason against the dastardly French besiegers under the aforementioned Chevalier. He is an Eagle Figures casting on one of their horses, painted, as usual, by me with as much gold lace as I could safely muster. Given that he represents the "other village" in my story, and Occasional Wargamer Brother Kev lives in said "other village", guess who is commanding the British in our forthcoming "Wyrley Retinue" outing to the Barrage Show in Stafford on 8th July!


Next up is Colonel Wyle E. Fox, of one of His Majesty's Light Infantry regiments, who prefers to go around largely unadorned with the sort of lacey accoutrements so beloved of enemy snipers. This figure is by Dixon Miniatures and, being a tad smaller than the likes of Eagle Figures and Redoubt, was raised up on his base to make him look like he is standing on a rock. Visibility past the troops was a problem for commanders in this era and more than a couple were wounded or worse getting a better look at events. General Wolfe is the classic case in point!


Last up is Major Benjamin. I have yet to decide if he will join the relief or be cooped up in the fort. He is another Dixon figure mounted on a suitable piece of slightly higher terrain.

And that is my British command so far.

The Chevalier will make an appearance soon!

G


Saturday 16 June 2018

The Founding of Fort Nummanmason, Part 2

Hello again.

Fort Nummanmason (don't bother looking for it on a map or researching it in a history book...) started to take shape in my previous post, ready to form part of the forthcoming "Wyrley Retinue" demo game at the Barrage Show in Stafford on 8th July at Blessed William Howard Catholic High School. If you recall, we left the building of that edifice, and the posts describing the construction, at the stage where the basic pieces were built but lacked detailing and painting.

So, what did I do next?


1) Add your details before you start to texture the relevant surfaces. The gabions are from Renedra, who market a lot of plastic bits and pieces for wargamers from bases to fences and also make stuff for others, such as the Perry's. I also added bits of twig and other detritus to show the sort of attempts the defenders would have made to shore up their cannon=battered defences.


2) The two photos above also show the beginning of the paintwork required above and beyond the fences. The battening for the walkways was painted a medium brown (GW Steel Legion Drab), then drybrushed in various greys and knocked back with the odd brown wash until I got the wethered wood look I was after.


3) Once these bits are done, it is time to texture all the relevant earth bits, using wood filler. I used a cheap, brown version for this, but any type is suitable, as you will be painting it extensively once it has dried. Make sure you get into all the various nooks and crannies! I used textured paint ("Basetex" or similar) to fill the tops of the gabions as its finer texture made it more controllable in such small areas. Once painted, it all ties in.


4) I have missed out a few stages of paintwork to get to the above pictures! Starting with a chocolate brown (Wilko's "Java Bean" in this case, but any dark, chocolate brown colour will do), I painted all the earth areas on the pieces. They were then heavily drybrushed with an earthy colour (Humbrol Dark Earth), then again with a sand/ light earth colour (Wilko's Safari Sand) and finally with a pale, creamy colour (Wilko's masonry paint, colour unknown because the label has fallen off!). Once this is complete, you have a dried earth base on which to add grass and other textures as desired.

5) I cheated a little and used "Basetex" for the grassy areas, but flock or painted grit/ sand/ ballast would do. Once the "Basetex" was dry, I drybrushed it first with Wilko "Warm Yellow" and finally with Wilko "Yellow Submarine". I still have the option of adding bits of foliage and other material to enhance the pieces, but they are basically finished and ready as they stand.

And here they are arranged as they will appear on the tabletop for the aforementioned demo game, together with a little, burnt out storage hut I have built to show the extent of the British position as they defend the fort under heavy bombardment whilst awaiting relief, which is the basis for the whole game, "The Relief of Fort Nummanmason".

Apart from perhaps adding some extra foliage detail, I think I will certainly tone down the glacis on the fort to blend it in better with my terrain boards!


I am pretty happy with the pieces, but there are a couple of things I would do differently with hindsight.

  • Tone down that light green on the glacis.
  • Make the corner as one piece to avoid the gap which is still visible.
But, there you have it. The total make took several days overall, but only several hours across those days. Waiting for paint to dry allowed me to crack on with other things, such as the burnt-out hut, and the whole project was a welcome distraction. There is absolutely nothing to stop me building the rest of the fort either!

G

Saturday 9 June 2018

The Founding of Fort Nummanmason, pt 1

Hello again.

As well as painting up FIW figures for the forthcoming "Wyrley Retinue" outing to the Barrage Show in Stafford on 8th July, you may also know that I need some terrain too for what we have in mind for the demo game we are putting on.

So, by way of an introduction, I thought I would show a little bit of terrain building and introduce Fort Nummanmason, the relief of which is the subject of the aforementioned game.

Before starting on this, I looked at various options. Ticonderoga is one of the iconic fortresses of this war and era, but it was a classic Vauban-style, glacis with masonry foundations affair and not what I wanted. I sort of liked the look of Fort William Henry as depicted in the Daniel Day-Lewis film "The Last of the Mohicans", with log walls, a look further repeated in the "Bankfoot Wilderness" campaign articles in Charles Grant's "Wargamers' Annual" of a couple of years back, so that was it.

But how to go about what I was looking for?

Ladies and gentlemen, boys and girls, I give you a "masterclass" (sic - it's more of a "how not to" perhaps...).

1) Firstly, decide what you want. In my case, apart form the log walls mentioned, it was not going to be a full fort, but a mere corner of one which would fir in one corner of the terrain boards. The action was to be more about the fight between the besiegers and relievers, not an attempt to storm a toy castle! This does, however, help to determine how you will build your chosen piece and what materials you wish to use to do so.

2) I needed:
> some thin MDF on which to base the pieces
> some batten around 25x30mm
> some shaped wood used to smooth off hard edges (architrave?)
> some bamboo skewers
> some coffee stirrers
> a hot glue gun
> some PVA glue
> UHU or similar general purpose glue
> some tree texturing material
> some wood filler
> various scrap bits of card and wooden matter
> some Renedra gabions
> paint
> various tools, such as a saw, sandpaper, clippers, etc

Some of the raw materials, cut to roughly four inch  lengths. The angled ends will be the actual corner of the fort

3) Cut your MDF bases to your required size and the battens to match.
4) After carefully matching up the loose pieces to ensure it all fits together properly, glue the batten pieces to the MDF bases using the hot glue gun. The battens will form the walkways inside the fort walls.
5) Once the battens are set firmly, cut bamboo skewers to the desired length using the clippers and, again using the hot glue gun, stick them upright against the intended wall face of the batten.
6) Once this too is set firmly, add the architrave piece to form a slight glacis in front of your log wall, as in the next photo.


7) In order to show that the fort had seen some action, I trimmed many of the bamboo skewers to show damage before gluing them down. This fort is under siege, you know!


8) I made three pieces in all, giving a corner of a fort as desired, measuring around 6x12 inches overall, which I deemed fine for my 28mm figures and the proposed game.
9) To thicken up the bamboo skewers and make them look more like tree trunks, I used "Flexibark" by a company called "Greenscene". This gave the skewers a rough texture.


10) I also trimmed some coffee stirrers to the required length to form a neat wall to hold what would be earthen walkways in my fort.


11) And that is basically the initial construction complete.

The next part of this missive will cover detailing and painting.

G

Tuesday 5 June 2018

Regiment Bearn

Hello again.

Hot on the heels of their ensign, as befits a unit that does not want the shame of losing their colours, comes the full Regiment Bearn. As with previous French regiments (Royal Roussillon and La Reine - see previous posts), they are 20 figures strong and have just the single flag - no white, colonel's colours in New France (with the arguable exception of Royal-Roussillon, I am told...)

The French regiments are smaller than their British counterparts for two reasons:
  1. Historically, the French could not easily acquire reinforcements from either Europe (due to the Royal Navy controlling the seas) or locally, due to various animosities between different parties, etc., so were smaller at various engagements during the FIW.
  2. I like the idea of the British getting an extra fire dice as mooted in the "Last Argument of Kings" supplement for the "Black Powder" rules and having the regiments slightly larger fits that bill too.
As with the two previous French regiments, the figures are all Eagle Figures, available at many shows up and down the UK and via the usual mail order. Ian's service has always been exemplary whenever I have dealt with him, so, if you are looking to get into the Seven Years' War in some aspect or simply looking to enhance your collection, give Eagle Figures a look.


Followers of this project may well have spotted a bit of a theme with the French. I'll recap...
  • Royal-Roussillon - blue facings, yellow lace.
  • La Reine - red facings, white lace
  • Bearn - blue facings white lace
So, the next offering needs red facings and yellow lace, so cue the Berry Regiment in the not-too-distant future! A nice bit of purple on the flag too, when it comes!

But that is it for the figures I planned on for the outing to the Barrage Show on 8th July, with the exception of sundry command figures for each side, which I will photograph and post about in the near future. I have terrain to build before expanding the figure collection, however.

G


Monday 4 June 2018

More of Louis' Finest

Hello again.

Hot on the heels of the 43rd Regiment of Foot for their red-coated opponents, the French are finally getting a few more troops to play with, having, it appears, successfully avoided the Royal Navy and managing to land a few more 28mm Gascons or whatever on the shores of New France, aka Canada.

I know I have painted the whole regiment, as I always do the flag(s) last, but, in a perverse reversal of fortune, I am presenting the flag first for this regiment.

So, third on the roster for the forces of Louis XV in his struggle with les Roastbeefs in New France/ Canada comes the Regiment Bearn, or, at least, its ensign.


The figure is from Eagle Figures, the flag my usual hand-painted calico with a brass pole affair and details for this one seem to be pretty common. again, however, there is a very good picture of the flag, in colour for those who need it, in Stuart Reid's Osprey title "British Redcoat vs French Fusilier" in the Combat series. I like these eighteenth century French flags - simple, yet colourful and readily identifiable for those like me who have a mere passing acquaintance with the period. I carefully drew this one out on the blank calico however in order to try and get the stripes straight!!!

The regiment will follow soon, once I have based it, textured the bases, etc.

It is 5-3 to the British so far in terms of completed regiments, but I have more French "light types" as well as some French artillery to even things out slightly. Either way, that will probably be it for FIW figures in readiness for the Barrage Show on 8th July, with the exception of some command figures for both sides.

The thrust of my next five weeks MUST be on the necessary terrain for our proposed game. I need some semblance of a fort, a building or two to go inside the fort, some trenchworks/ siegeworks and perhaps one or two buildings for a nearby village. I then have to try and work out a scenario to give those involved something to mull over and work through on the day and, who knows, the players MIGHT actually come away having enjoyed themselves...

G