As well as painting up FIW figures for the forthcoming "Wyrley Retinue" outing to the Barrage Show in Stafford on 8th July, you may also know that I need some terrain too for what we have in mind for the demo game we are putting on.
So, by way of an introduction, I thought I would show a little bit of terrain building and introduce Fort Nummanmason, the relief of which is the subject of the aforementioned game.
Before starting on this, I looked at various options. Ticonderoga is one of the iconic fortresses of this war and era, but it was a classic Vauban-style, glacis with masonry foundations affair and not what I wanted. I sort of liked the look of Fort William Henry as depicted in the Daniel Day-Lewis film "The Last of the Mohicans", with log walls, a look further repeated in the "Bankfoot Wilderness" campaign articles in Charles Grant's "Wargamers' Annual" of a couple of years back, so that was it.
But how to go about what I was looking for?
Ladies and gentlemen, boys and girls, I give you a "masterclass" (sic - it's more of a "how not to" perhaps...).
1) Firstly, decide what you want. In my case, apart form the log walls mentioned, it was not going to be a full fort, but a mere corner of one which would fir in one corner of the terrain boards. The action was to be more about the fight between the besiegers and relievers, not an attempt to storm a toy castle! This does, however, help to determine how you will build your chosen piece and what materials you wish to use to do so.
2) I needed:
> some thin MDF on which to base the pieces
> some batten around 25x30mm
> some shaped wood used to smooth off hard edges (architrave?)
> some bamboo skewers
> some coffee stirrers
> a hot glue gun
> some PVA glue
> UHU or similar general purpose glue
> some tree texturing material
> some wood filler
> various scrap bits of card and wooden matter
> some Renedra gabions
> paint
> various tools, such as a saw, sandpaper, clippers, etc
 |
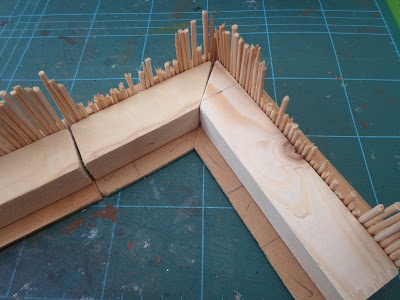
| Some of the raw materials, cut to roughly four inch lengths. The angled ends will be the actual corner of the fort |
3) Cut your MDF bases to your required size and the battens to match.
4) After carefully matching up the loose pieces to ensure it all fits together properly, glue the batten pieces to the MDF bases using the hot glue gun. The battens will form the walkways inside the fort walls.
5) Once the battens are set firmly, cut bamboo skewers to the desired length using the clippers and, again using the hot glue gun, stick them upright against the intended wall face of the batten.
6) Once this too is set firmly, add the architrave piece to form a slight glacis in front of your log wall, as in the next photo.
7) In order to show that the fort had seen some action, I trimmed many of the bamboo skewers to show damage before gluing them down. This fort is under siege, you know!
8) I made three pieces in all, giving a corner of a fort as desired, measuring around 6x12 inches overall, which I deemed fine for my 28mm figures and the proposed game.
9) To thicken up the bamboo skewers and make them look more like tree trunks, I used "Flexibark" by a company called "Greenscene". This gave the skewers a rough texture.
10) I also trimmed some coffee stirrers to the required length to form a neat wall to hold what would be earthen walkways in my fort.
 |
The next part of this missive will cover detailing and painting.
G


Looks pretty cool.
ReplyDelete